Shower Tray Installation
When buying shower trays it is important to select an item that has a specific shape and size to fit the type of enclosure you have purchased. Take care when installing a new shower tray to ensure that the tray is level. The helps the water to deposit down the waste quickly and efficiently. Although a professional is recommended for shower tray installation, many people might choose to install it themselves. Before this should be decided it is important for the person carrying out the task to know exactly what they are doing in order to limit the risks that can be caused.
Installing a Shower Tray
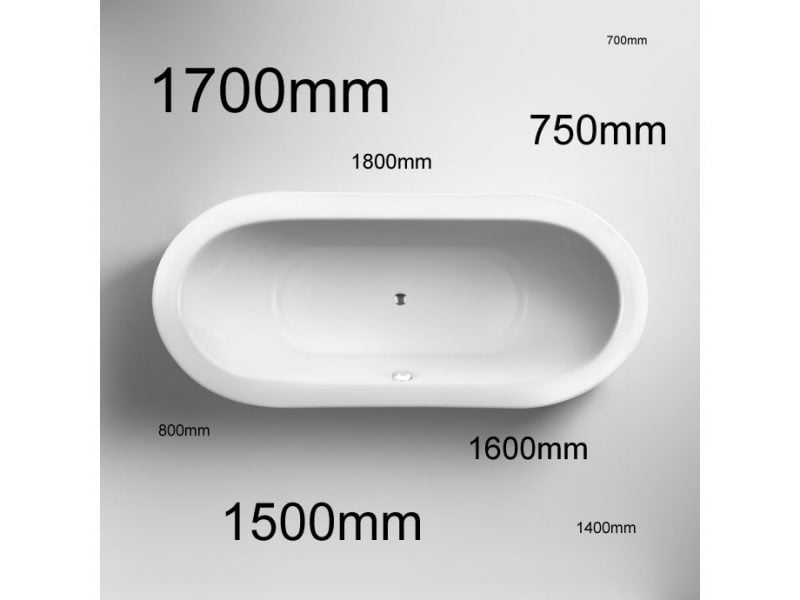
When selecting your shower tray its a good idea to view how much space is available in your room. It’s no good buying a large tray for a small room as a lot of space will be sacrificed just for one item. It is also necessary to analyse the profile of the tray. Some are lower than others therefore you need to leave enough room for the shower enclosure to fit. Furthermore consider the height of the shower head if it is to be installed high on the wall. For shower tray installation you need to have access to the waste pipe situated underneath. You should also make sure that the tray is water tight. This is to restrict water getting under the tray that can damage floors and walls. If this happens, paying for the recovery will not appeal to you.

Before purchasing your shower tray, cover all your bases by checking its width, height and colour. When your tray is ready to be installed, ensure you are bedding the tray onto a flat, even floor. This can be checked with a good quality spirit level. It will give you an accurate reading of how level your bathroom floor is. If your tray comes with feet, make sure you adjust them accordingly giving the correct clearance from the floor. The majority of stone resin trays do not require feet. Therefore they sit on a base instead which will give clear access to the waste and drainage.
How to Fit a Shower Tray
Whether you are renovating your bathroom or simply just replacing the tray, it is crucial that it is fitted correctly. Follow some basic steps for shower tray installation and you can have many years of happy showering ahead of you. The shower tray, otherwise known as the base of your shower enclosure, is a very important fixture to install. After all, without it, you’ll have nowhere to stand for your showers! It is relatively easy to complete the install yourself without the assistance of a plumber. Although you will need a basic knowledge of carpentry and plumbing to do so accurately. Always protect your tray during installation using a dust sheet. You need to avoid cleaning it with strong bleaches as this can lead to damage and disrepair. If you’re prepared to give it a try, follow our instructions below.

Shower Tray Installation Guide:
- 1. Typically shower trays are fitted to wooden flooring, enabling you to access beneath. In the event that you cannot do this a special riser kit is required. This will enable you to fit the waste kit beneath while ensuring that you do not accidentally drill into any piping or cables.
- 2. Position the tray to your liking and draw around the entirety of it in pencil. Ensure that you also mark the area where the waste will be deposited.
- 3. Place the waste trap on the marked area, placing the outlet in the correct placement to the waste pipe running beneath your floor. You will then need to place two hole saws in place of your waste trap. Then drill through the centre of both using an electric drill. Insert your waste trap. If the hole is too tight around the waste trap, you can open up some more space using a jigsaw. You’ll need to ensure that no pipes or cables lie directly beneath the space where you intend to drill.
- 4. Cover the area with waterproof sealer.
- 5. Ensure that the sealer is dry and apply a thick layer of mortar. You can level this off using a trowel until the surface is smooth and level.
- 6. Attach a pair of glass suction lifters to the tray. These can easily be attached securely in place, enabling you to lift the tray and apply it to the cement. Prior to doing this, you will need to remove the masking from the edges of the tray, if you haven’t already done so. You can then steadily lower your tray down onto the cement. You’ll want to press down to ensure that the tray is adequately stuck and remove the glass suction lifters.
- 7. A spirit level can be used to ensure that the tray is adequately levelled out. In the event that the tray is not perfectly level you can simply push whichever part of the tray is not ideally placed down with your hand. It is important to make sure your tray is level and securely fixed in place. The main advantage of a level shower tray is that water will run away quickly into the waste outlet.
- 8. Use a small trowel to slice away excess mortar that has seeped out from beneath the edges of the tray.
- 9. The tray requires a minimum of 24 hours to set in place. A silicone sealant or shower tray seal should be applied between the gap that connects tray and the wall to secure it in place.
Shower Tray Installation – Final Considerations:
After you are confident that your tray has been placed correctly, you can begin sealing it. Using a waterproof sealant, make sure that there is no space between the tray itself and the wall and floor surrounding it. If your shower tray is sealed incorrectly, it can lead to leakages and mould growth, and should therefore be avoided. Products such as Classi Seal seal right around the edge of your shower tray installation. They will also allow tiles to be installed immediately after, making the installation of your shower enclosure quick and simple. Finally the best thing you can do before shower tray installation is to always read the instructions fully as this can give you advice on assembly.
At Bella Bathrooms we stock some of the best shower trays available. You can purchase easily on our online website therefore finding the ideal product for you has never been easier.