How To Install a Shower Enclosure
Once you have selected the best shower enclosure from our range you need to consider how you will install it. Follow our handy guide on how to install a shower enclosure to make the process more straightforward. If you consider using a frameless glass enclosure this can reduce the amount of cleaning needed to be done and look cleaner for longer when cleaned. This is because the water and lime scale cannot build up in places which is difficult to clean. It would be advised that you consider using a professional to install the tray’s drainage system.
How To Install a Shower Enclosure:
Initial Considerations:
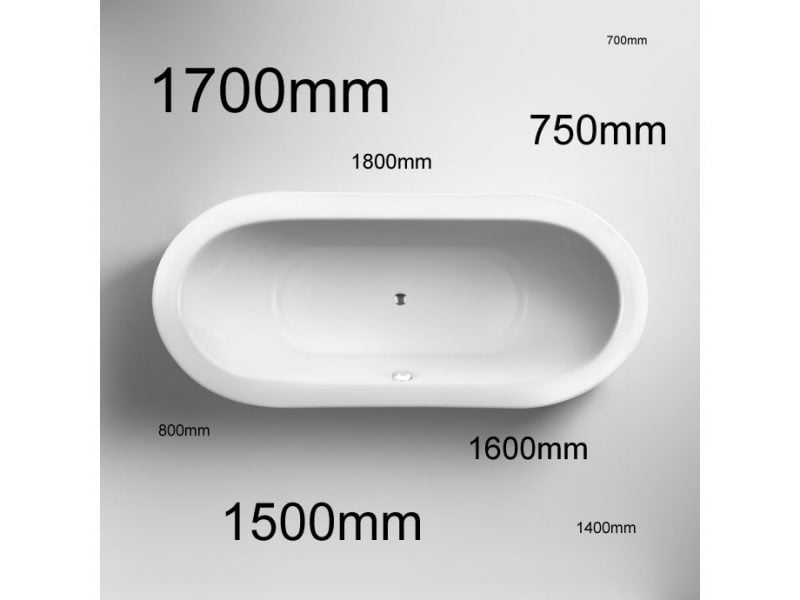
When you are installing a shower enclosure it is import to remember that you cannot have plastered walls it has to be tiled only, this is because the water needs to run down into the tray. A good quality sealant will help to prevent leaks and damages to the floor and walls around the shower over the time the enclosure is in use.
How to Fit a Shower Enclosure:
Step 1
These are steps to installing the shower enclosure, it should take around half a day to one full day for the enclosure to be installed but this could be made quicker by having some to help with the installation. Firstly install the tray making sure that the feet of the tray are on the tray because this gives it the height for the waste unit to be installed. Using a spirit level to check the level of the tray, if it’s not level then using a spanner you adjust the feet to the level you need. Then just place the waste outlet into the tray and then you’re ready to start sealing.
Step 2
Now moving on to the second stage of installing this is sealing the shower tray this is done by using a sealant gun. This is used to put a continuous bead of silicone sealant around the shower tray edge, also not forgetting to seal the side panels which meet the floor.
Final Step
The third and final step is fitting and sealing the surrounding, for this step you would need to get some assistance from someone else. You need to fix the panels to the tiled wall and use a sprit level will help position the panels. After you have drilled the pilot holes then you should insert plugs to give the screws a better hold in the wall and then you are ready for the panels to be fixed into the wall. Make sure before you put the panel into the wall that it is where you want it because this will effect where you door will be placed.
Next you need to fix the panel into position while the panels rest on the rim of the tray so this is when it’s handy to get help from another person. These will be fixed using a screwdriver and then it’s a case of fixing the handle to the door if it’s not already fixed and attaching that. Finally just apply a continuous bead of silicone sealant along the external edges but not the internal edges.
Hopefully our guide on how to install a shower enclosure will give you an insight into successful installation. Please get in contact with us with your own tips and hints @BellaBathrooms.